You may remember my last update said that I was planning doing something special with the Debbie Bliss Andes wool I had well this is it, I wanted to do a Japanese flower scarf.
After looking around on the net I have seen quite a few Japanese flower scarfs that have really taken my eye. They remind me of the work of Sophie Digard which I absolutely love although her work is so fine and intricate and my crocheting skills are not that good yet!!
I had seen these scarfs in Selfridges when i went to London, but the prices were way out of my price range!
Lucy on Attic24 had done a flower scarf but had not done a tutorial and after looking around on the net I couldn't find one or was directed to purchase a Japanese book with instructions in, but I can't read crochet diagram patterns so thought that it would just be a waste of money! So I have studied some pictures and after lots and lots of fiddling around and lots and lots of cursing I have finally worked out a flower that I think is pretty good!! So here is my own tutorial for a Japanese flower.
I am using a 3mm hook and Debbie Bliss Andes wool all crochet terms are UK
Slip Stitch (sl st) insert hook, yarn over and pull back through all so you have 1 stitch on hook
Double Crochet (DC) = insert hook, yarn round pull through, 2 on hook, yarn over though 2
Half Treble Crochet (HTC) = yarn over, insert hook, yarn over, 3 on hook, pull through all 3 stitches
Treble Crochet (TR) = yarn over insert hook, yarn over pull through, 3 on hook, yarn round pull through 2, yarn round though 2
All of my flowers consist of 3 colours.
Chain 6
and sl st into first chain for form a ring then chain 3 (this counts as 1 treble crochet)
Then you need to do 11 more treble crochets into the ring and join with a sl st into the 3rd chain of the first treble crochet so you should end up with something that looks like the picture below. That is round 1 finished.
then round 2 is
chain 5 this counts as a treble crochet and 2 chains
into every chain space you now need to do 1 treble crochet and 2 chains, you can see by where I am pointing my needle where you need to insert your needle.
you should end up with a little wagon wheel looking piece with 12 spaces finish with a sl st.
Remember in each space it is 1 treble crochet then chain 2, into next space 1 treble, chain 2 etc............
You now need to change colour for round 3.
Insert you hook into a space and join the new wool with a sl st. Into each space you are going to do 4 treble crochets.
So in the first space you chain 3 this counts as 1 treble crochet and then 3 treble crochets, into the next space you do 4 treble crochets and repeat into each space on the cart wheel
until you crochet piece looks like this, to finish you sl st into the 3rd chain on the first 3 chain you did.
Ok?? Ready for round 4
Change colour. Into any of the chains on the outer of round 3 insert your hook, sl st the new colour and chain 5. You now need to skip the next 2 chains and sl st into the 3rd chain
you should have something that looks like this, this is the start of your petals.
Next slip stitch into the next stitch and chain 5, skip the next 2 stitches, sl st into the 3rd and then sl st into the 4th and chain 5
continue all the way around until you have 12 little loops which are the start of the petals
Into each of the petal loops I have crocheted 8 treble crochets to form the petal
before you start onto the next loop and next set of 8 treble crochets you have to do a slip stitch (sl st) into the stitch between the 2 loops, I have put a needle into the picture below to show you where to insert you hook.
Continue all the way around your 12 loops with 8 treble crochets into each loop followed by a slip stitch into the stitch between the petals.
I hope that all of that makes sense!!!
Finish off with a sl st and there it is your very own Japanese flower.
I have used to join as you go method when making my scarf and I should have said that as I crochet I try to incorporate any thread as I go along to save time on darning them in at the end.
I have been asked how I join my flowers together, so here goes with a brief explanation!
To attach as you go this is the method that I use, as you can see from the picture above the flowers are attached to each other with two petals. As I start on round 5, I crochet 3 TC and then insert my needle into the 3rd stitch from the slip stitch the petal on the flower I am attaching to I pull the yarn through and then do my 4th TC, insert the hook again into the adjoining petals next stitch (4th) and the do my 5th TC, continue until I have 8 TC on the petal
This picture shows that I have joined onto 2 chains on the adjoining petal and am about to start my 5th TC you then continue as normal until you get to the next petal where you will start again and crochet 3 TC insert hook into 3rd chain on matching petal on other flower, pull yarn though do 4th TC, insert yarn into next stitch, pull through, 5th TC and continue, the next petal will be joining onto a new flower.
If you look at the picture my first 2 petal are adjoined to the blue flower and the next 2 petals are adjoined to the gold flower.
I hope that that gives you some idea of how I do this, if you are at all confused please mail me and I will try to help!
A quick breakdown of the pattern
Chain 6 sl st into ring
Round 1: chain 3, 11 DC into ring sl st to join, you should have 12 DC
Round 2: chain 5, 1 tb, chain 2, continue until you have 12 TC
Round 3: change colour chain 3 and then 3 TC into 1st space on cartwheel, next 4 TC into each space and sl st to join
Round 4: Chain 5, skip 2 sl st into next stitch, sl st into next and chain 5, continue until 12 loops
Round 5: 8 TC into each look and sl st into stitch between loops continue until you have 12 petals and finish with a sl st.
I hope that that has all made sense, it is the first tutorial I have done and its is rather hard trying to explain what to do in words and pictures!
I haven't finished my scarf yet, but this is where I am up to at present
I still don't really know how big its going to be yet, that will be determined by the amount of wool that I have, but as you can see at the moment it is a little curly and although it looks great I will be blocking it to give it the ultimate finished look.
My new cat Tiddles is certainly enjoying my passion for wool and at times it can be rather difficult to get on as she seems to love the wool as much as me!
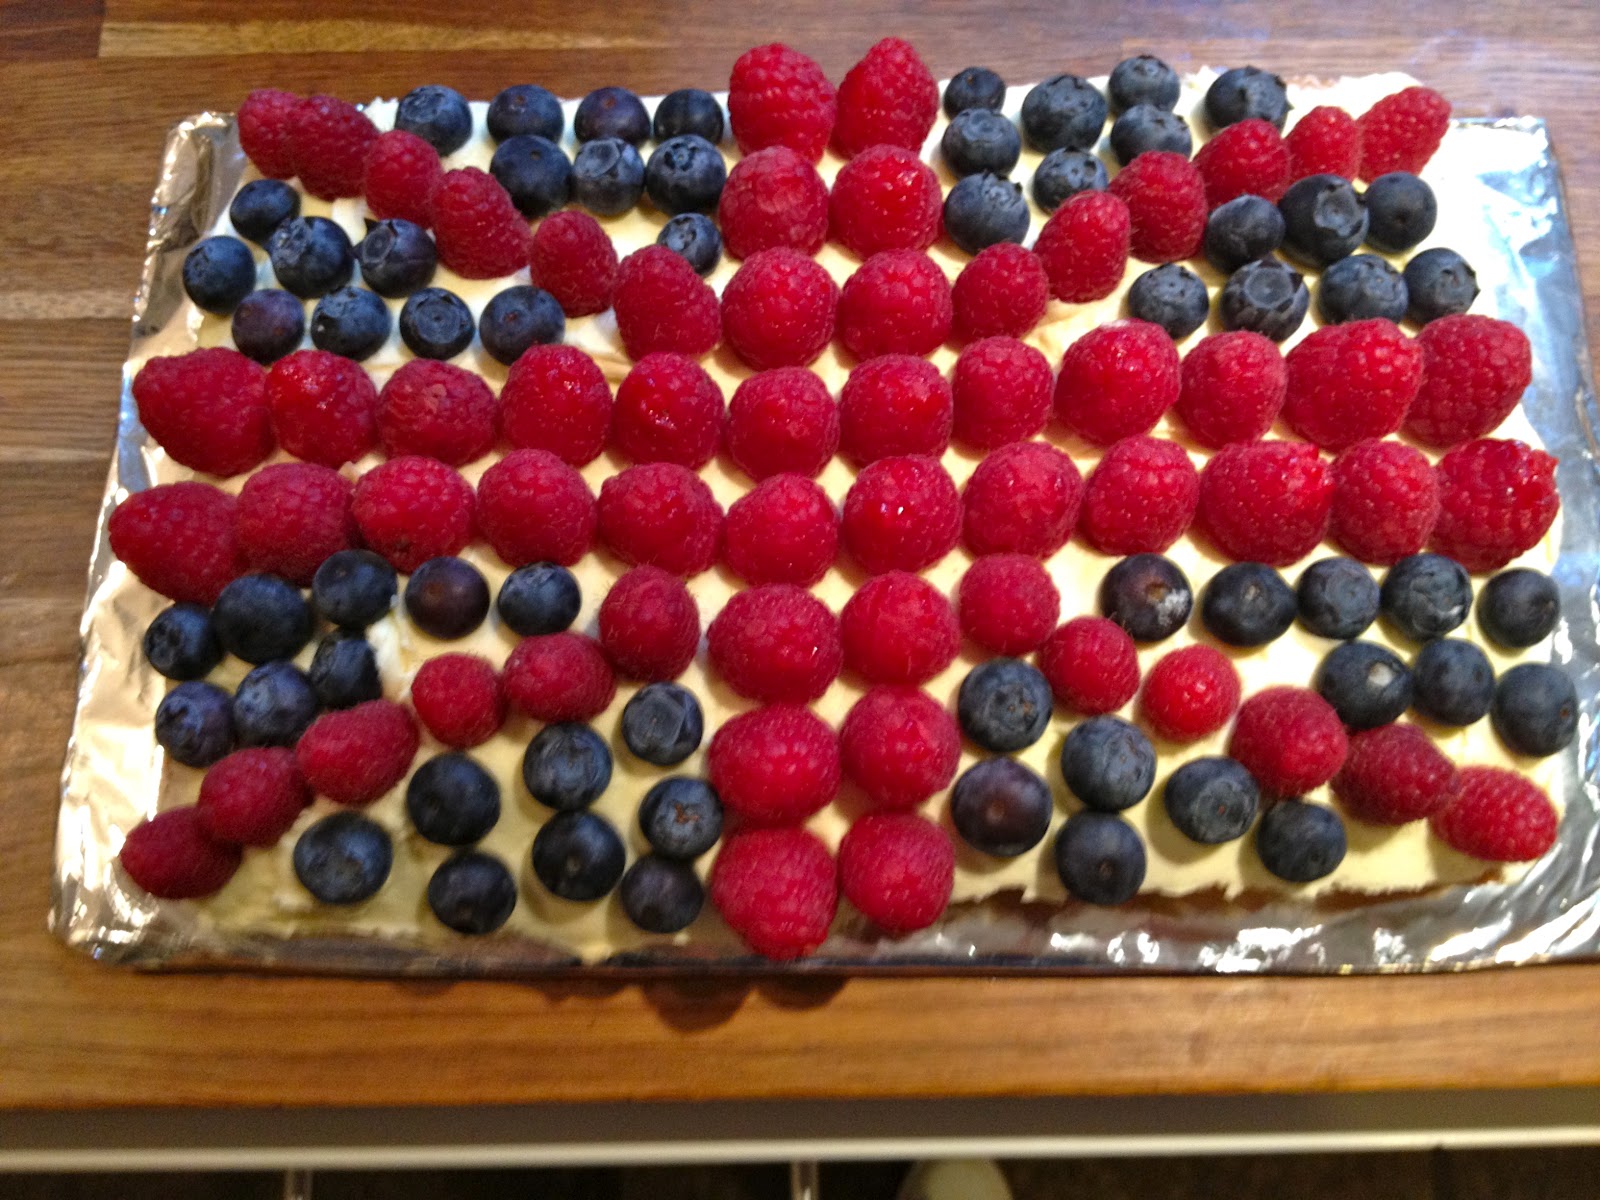
Other things going on on the hill this week were lots of guest for afternoon tea, cakes and champagne. I just adore having an excuse to do baking and cooking. I made a totally fattening calorific gorgeous, devine chocolate cake, millionaires shortbread, lemon and poppy seed biscuits, scones with thick cream and summer fruits
Bakewell tart
and a raspberry and fresh cream victoria sponge cake, ohhhh this was so yummy.
Shopping around the collectors market this week I found this lovely little tin workbox which for £2 was a bargain I couldn't say no to
and it holds some of my embroidery threads and looks a treat!
Other purchases were a little more wool, a little spotty tin of pins, I'm going to need them for blocking out the scarf! a washable pen for marking onto fabric, a roll of old lace, vintage linen napkins and a square linen and lace tray cloth. I have so ideas that I am throwing about in my head of doing some freestyle embroidery onto them, but at the moment I'm unsure of what form this will take!
My supply of Anchor perle cotton don't they just look splendid sitting there all colourful in their little boxes.
My very very special delivery of the week, purchased for me by my lovely husband was a new computerised Brother sewing machine, well when I say new, it is new to me, we got it from ebay. Now this is supposed to be for me but in reality its just as much for my husband as me as he likes to show me just how good he is on a sewing machine!
I have just about managed to switch it on and have a go at some of the many many stitches it has and I am determined that I am going to master how to do it and become a competent machinist. When you stitch on it it purrs like a little Rolls Royce engine and doesn't run away with me, so when my book 'Sewing Machine Basics' by Jane Bolsover arrives from Amazon I will be away!
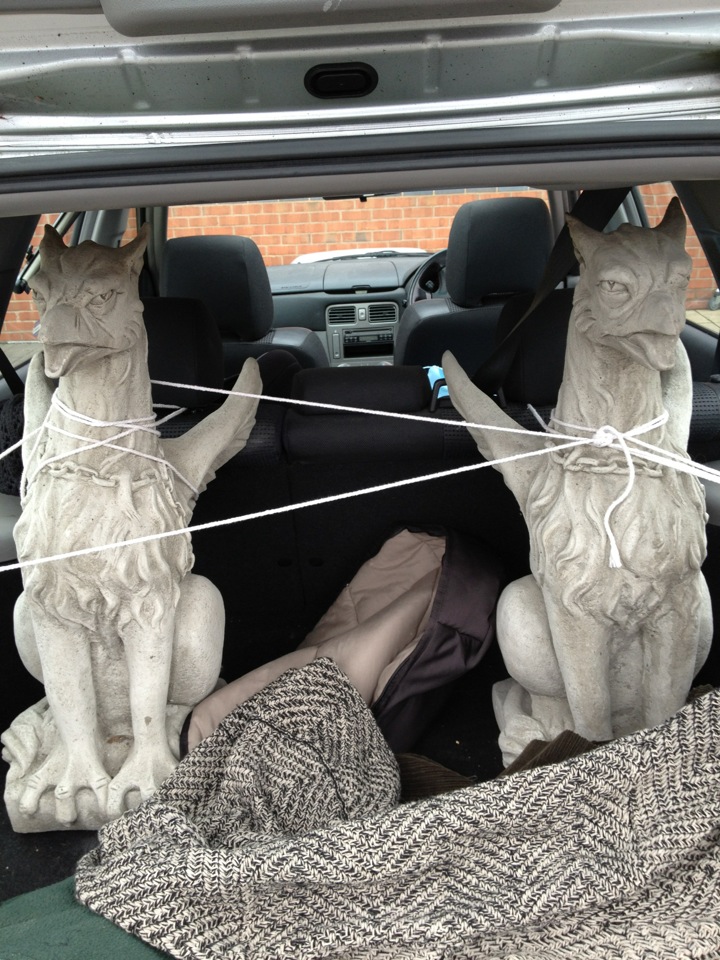
It was my husbands birthday this week too and all he wanted was a pair of stone griffins! He does have unusual tastes other presents in previous years have been a set of bag pipes, a bat detector, a top hat, a picture of a dog with a golden tooth???? and many other strange items!
Here they are sitting roped into the back of my car, I was decidedly worried that they would lurch through the back window of my car on the journey home.
Now there are not many houses that could present these statues like mine, but as I live in a castle I don't think that they look too ostentatious.
For the moment they have been put in front of the front doors which as you can see have not been renovated as yet, there final place will be on top of the walls put as they are so heavy and as we still have a lot of renovations to do outside, they will just have to stay here for the present.
I will keep you updated with the scarf and other goings on here at Ecton Hill
Claire xx