So here if the first of my Tah Dah's of todays blog

It just looked soooooo gorgeous all folded up and waiting to be taken to my little grandson

The colours are just so right with each other, they make you feel happy just looking at them. I was unsure about using an acrylic yarn as I much prefer natural fibres but this Stylecraft yarn was a dream to crochet with, soft, no rubbing on my fingers and it drapes really nicely

I haven't made a huge blanket as it is for a childs bed so I do have a little bit of yarn left to go back into my stash, so keep your eyes open for more projects


And here it is on the beanie bed sitting and waiting for a little boy to come and snuggle up in, I couldn't wait to get it on his bed and see how lovely it looked, it has bought a ray of sunshine into the room, my heart skipped a little beat as it went on, and I had a lovely feeling again that giving something that is homemade and has had love and thought put into it shows how much you care and makes others see that your child is loved and well cared for.

My second Tah Dah is my finished Cath Kidston tapestry purse, it really took only a few days to make and finish so I am very pleased.
As it is a Diamond Jubilee year I thought that it would be a nice touch to stitch my initials and the year on the back of the purse so that if it survives a few years my children may look back and think of me.
My hand needlecraft has a lot to be desired so I first maked it all out with pencil on the back on my cut up Sainsburys tea towel and then just did little back stitches in red and blue

Here are all the bits just waiting to be put together

and here it is all lined in a lovely red and white polka dot cotton and with a zip!!!

Now to be honest the zip has let the final project down a little, I really really struggled to get it in and with it pinned into place and pins sticking into me and after much cursing I did get it in but its not quite how I would have wished it to be

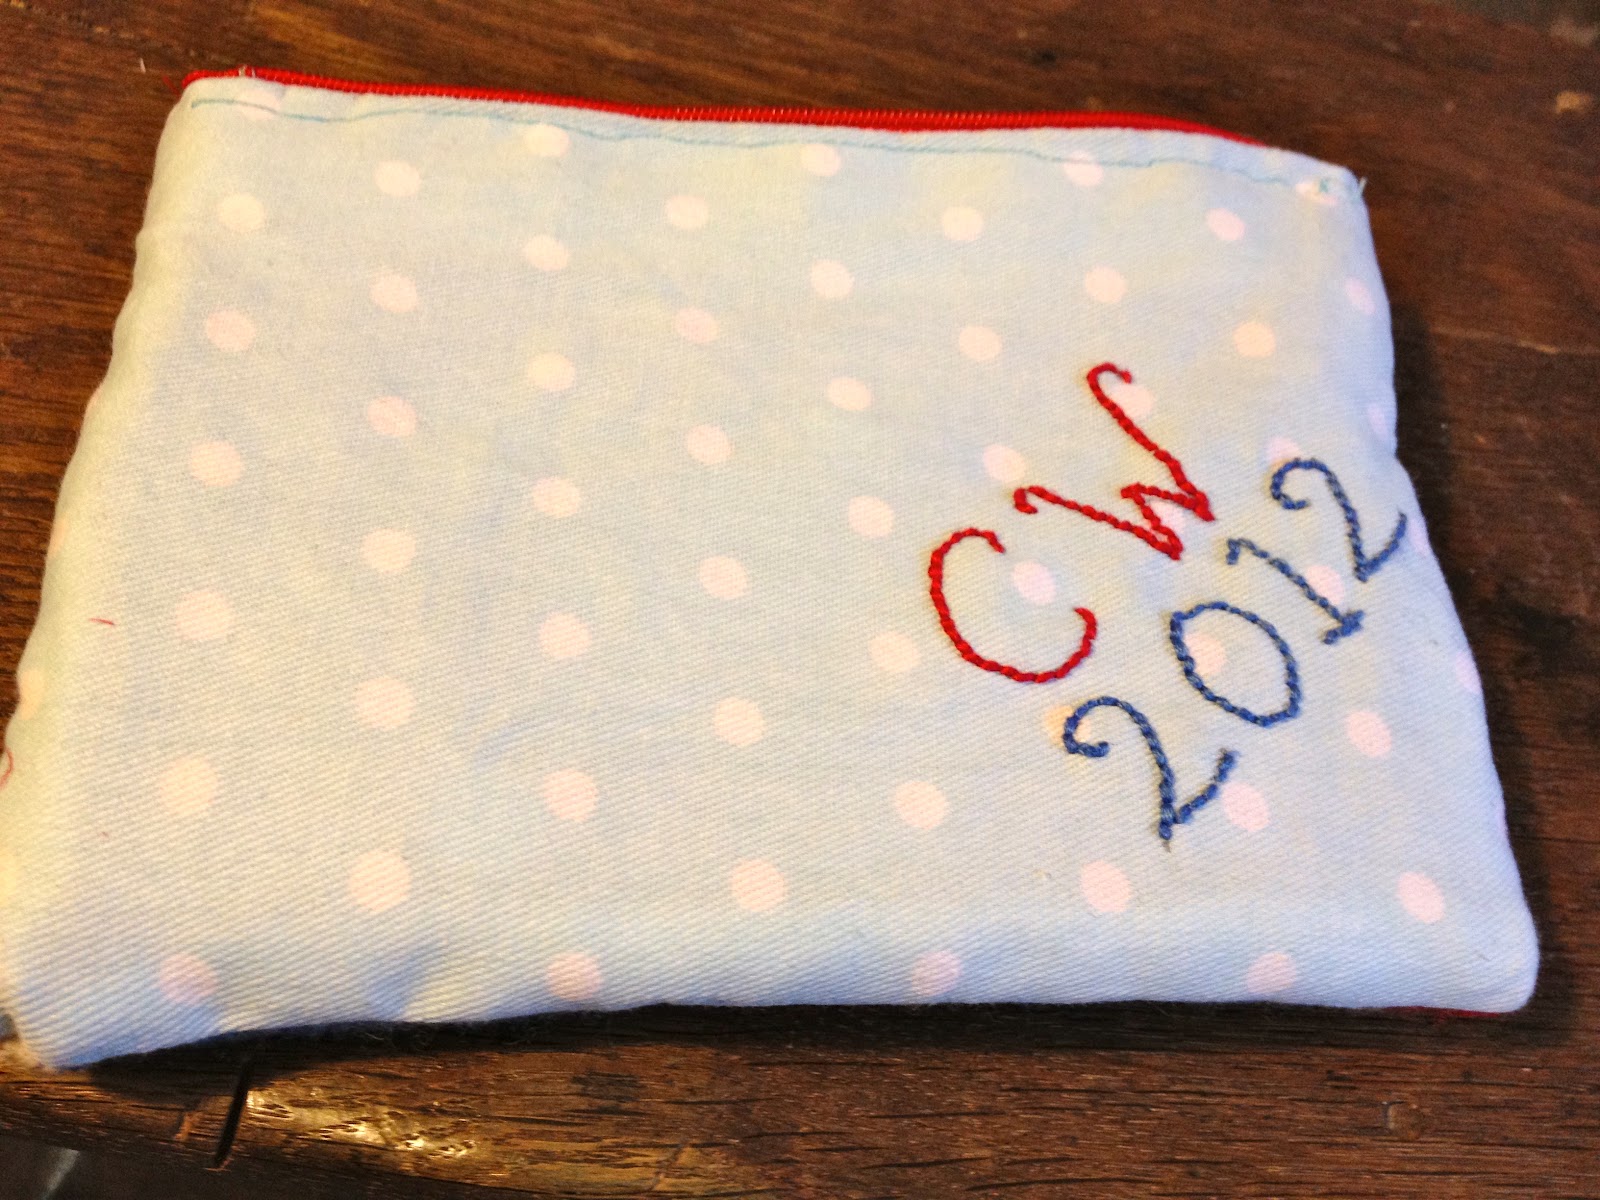
The finished purse is lovely I so enjoyed doing this it was really quick to do and gave a sense of virtually instant gratification. I don't know what I am going to use it for yet but no doubt I will soon find a useful purpose.

This weeks cake was a devine Carrot and Pineapple cake and it has stayed moist all week and I am glad that I tried something a little different, I topped it with a lovely sweet cream cheese topping.
So here is the recipe:-
300g plain flour
1/2 tsp bicarbonate of soda
1tsp baking powder
2tsp cinnamon
4 eggs
250ml oil (I used sunflower oil)
200g soft brown sugar
the zest of an orange and a lemon
200g of grated carrot
150g chopped walnuts
227g of chopped tinned pineapple pieces
Pre heat the oven to 140c that is in my fan oven so a little hotter if yours is not a fan and line a 20cm cake tin, make sure that it is quite a deep tin as you don't want your mixture escaping the top!
Right first sift the flour baking powder, bicarb and cinnamon together and then add in the sugar.
Whisk together the eggs, zests and oil and add this to the flour and sugar.
Stir in the grated carrots and then fold in the walnut (I actually didn't have any walnut so I used pecans) and then fold the pineapple pieces in, if you don't like pineapples then you could actually leave them out.
Put all this mixture into your tin, give it quick smooth over and pop into the oven for about 1 hour 20 minutes, give it a little test with a skewer and if it comes out clean with not mixture sticking to it then its ready.
While the cake is cooking, you can get on with the frosting, which is:-
125g of soft butter
250g cream cheese
50g icing sugar
The topping is so easy to make all you do is mix all the ingredients together, it is a good idea to make sure that the butter is soft and that the cream cheese is a room temperature so that is comes out lovely and silky smooth. Don't be tempted to put this frosting onto the cake before it is completely cold or it will just melt it and make it run off.
I make my cake look a little prettier by adding some little threads of orange zest just to give it a little colour. I will definitely be making this again, as you can see it was cut into and tested before I could even get my camera out!!

On a different note we now have a new addition to our family :) Her name is Tiddles, chosen by my youngest son Caleb. She is 7 weeks old and here she is with her little brother, isn't she just adorable!!!!!!

After the initial shock of discovering that we have a dog and a few hisses later I think that she has settled into our home quite nicely. Well she looks contented enough wouldn't you say?

I will soon be giving you an update on my next project which I am quite excited about!
Claire xx
Thank you sooo much for doing this. I am a knitter but have wanted to make this beautiful Japanese flower scarf since the first time I saw it. Acquiring the magazine is difficult and expensive. I am still a bit in the dark about how to connect as you go along. Could you help me out on that one?
ReplyDeleteHi Karen,
DeleteI will take some pictures and put them up to show you how you connect as you go!
Check back in a couple of days
Claire :)
Thank you!! I so appreciate it.
ReplyDeleteKaren I have put up some instructions of how I join as I go, if you are still struggling, let me know and I will try to help!
DeleteClaire :)
Thank you, Claire. Photos are excellent. Big help.
ReplyDelete